
Custom Javascript Dialog
Source Code: JavascriptDialog_src_demo.zip
Introduction
This article describe how to create a Custom Javascript Dialog in ASP.NET. And also, I’m gonna tell you about my experience that I got when I was implementing this dialog in my project.
I’d highly recommend you to download my sample before reading. There are two samples in Demo Project that you can download. The first example is for implementing Javascript Prompt in ASP.NET. Even thought using Javascript Prompt is not a big deal, you can learn how to communicate between the client-side (JS) variable and Server-side (C#) variable, how to register Javascript in Content Page and so on. The second one is the main sample for this article. This sample will show how to create a Custom Javascript Dialog in ASP.NET, some tricks and so on. All coding and issues are discussed in details very well in this article.
What you should already known
- ASP.NET 1.1 (C#) – esp: Page Template and DataGrid
- Javascript and CSS
Understanding of Current Sytem
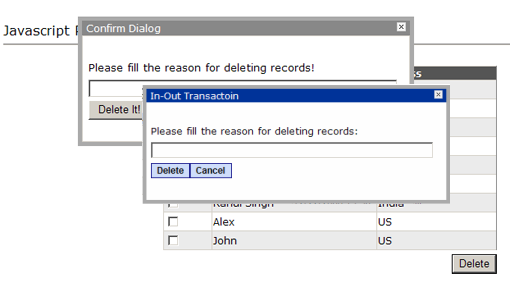
There is one listing page in the sytem. This page allows the user to delete multiple records at a time. The user has to enter a comment for the reason why he/she wants to delete those records. It can be done very easily in ASP.NET by using DataGrid with checked boxes. ( plus one textbox for comment and one button for deleting) Unfortunetly, our client is not happy with having one extra textbox for filling a comment in this page cuz of some UI issues. They more perfer to have something like Javascript Popup window with nice UI in this page.
Our Goals
- Showing Javascript Dialog : The Main Goal is that showing nice javascript dialog when the user click the “Delete” button. [Showing Popup in Javascript is not that difficult but we have other requirement too.].
- Handling the sequence of the events :Since we are already written the code for Deleting the records in Server-side, this code (C#) should be executed after executing the client-script.
- Accessing the client-side variable from Service-side, The comment text has to be accessible from Server-side code.
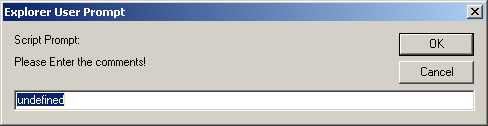
Javascript Prompts
var str = prompt('Please Enter the comments!');
“Prompt” is a build-in function in Javascript to show a window like that below picture. It’s extremely easy to use. Another advantage is that the Server-side won’t be executed as long as this prompt is showing. The Server-side will be executed ONLY if the user click “OK” or “Cancel” so that we don’t need to any trick or hack to pause the Server-side executing.
Okay. Let’s start coding! (I’m gonna use the basepage class that I have used in this sample (zip file no #1).) Firstly, we write a Javascript function called AskForComment as below.
Note that we have to check whether the user cancel the operation or not.
(Refer to Blue line. we are checking three condition in this line.
(str == ")is checking whether the user fills anything or not. Actually, we should trim this variable.( str == 'undefined')is also checking the same thing. only different is that ‘undefined’ is the default value of prompt in IE.( str == null)is checking whether the user click “Cancel” button or not.) If the user doesn’t fill anything or click “Cancel” then our function is gonna return “false”, which means there wont be any further execution.
| |
Accessing the Client-side variable (variable named “str” in this sample ) from Server-side Code
Here, we have one problem in accessing the javascript variable called “str” from Server-side code. So, we need to have one inferface that can be accessible from both Client-side and Server-side. So, I decide to use a Hidden Field as an interface in this sample and named it “hiddenComment” and also change this HTML Hidden Control to Server side control by adding "runat="server". Now, we have a control that can be accessed from Javascript and Server-side script (C#).
The following changes (in blue color) we need to made in our Javascript for getting the object of Hidden Field. (Note that \_ctl5\_hiddenComment is the ClientID of Server-side Hidden Field.)
| |
We just finished writing the Javascript as above with the required feature. But I think that it’s better if we register this Javascript function in Page_PreRender event since the ClientId of Server-side Hidden Field might be changed anytime. (If you don’t know how to register the Javascript Function in Page_PreRender Event, please take a look at SampleControl1.ascx in Sample Project. You will see the completed code in SampleControl1_PreRender Event.)
After that, there is only two things we need to do. First one is that we have to attach our Javascript Function in “Delete” button.
btnDelete.Attributes.Add("onclick", "return AskForComment();");
Note: return is very important here. Because we don’t want any further execution in case the user click “Cancel”.
Then, the last thing is that we have to check whether we are able to get the value of Hidden Field in the Click Event of “Delete” Button.
| |
Demo
Please open the page called Sample1.aspx from my sample. Set the breakpoint at the Click event of “Delete” button. Then, run the web project.
There are one DataGrid with Checkboxes in this page “Sample1.aspx”. If you click the “Delete” button then the Javascript Prompt will be shown for asking the comment. Type something you want and click “OK” button. Then, the Click event of “Delete” button will be fired. Now, you can check the value of Hidden Field “hiddenComment”. You will get the text that you type in Prompt.
*** Note: I didn’t use any database for the data that suppose to be in DataGrid. I have created two classes called “Person” and “Persons” in this sample. and All data from Persons class will be binded to DataGrid.
In the Click Event of “Delete” button, I didn’t put anything related to Database. But you will find the code for getting the value of hidden field and getting the selected item of DataGrid.
Okay. We have just done. But the main disadvantage that I really don’t like is that it doesn’t look good. It looks very different from the existing UI of our current system. So, We will think about other way.
Custom Javascript Dialog
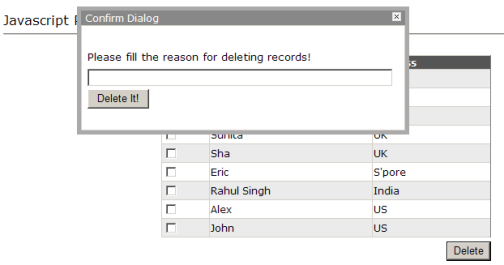
As you all know, there are a lot of Opensource Javascript **box in Internet. They all have their pros and cons. Some Javascript Libraries or toolkits have a lot of features such as Ajax support, DOM, Animation, Drag and Drop and so on. but they are not Light weight. In our sample, we just need to create one Custom Javascript Dialog . We dont any other features and we dont wanna load a ton of javascript objects (which won’t be used anyway) in web browser.
So, I’m just going though the source code of Javascript Toolkit and I come to know that Greybox Redux is pretty good toolkit and has very sample implementation.
but one thing I don’t like is that this toolkit is using IFrame. As IFrame is using in it, we might properly need to have one extra page to show in IFrame. However, we don’t like to have one extra page in our System. So, I decide to use HTML Table instead of IFrame since I don’t need to show anything dynamic on this dialog.
Okay. Let’s start!
Creating HTML Window
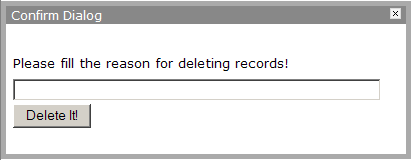
Before we start creating a custom dialog dynamically, we should start creating a static dialog in HTML.
In Head Tag ~
| |
In Body Tag ~
| |
Output will be as following image.
Note:
- DIV “
GB_Window” and CSS “#GB_window” is for base dialog. - DIV “GB_caption” and CSS “#GB_caption” is for the Caption of Dialog. For example: if you wanna have “blue color” (instead of “grey color”) for the background of capture, you can simply change the color value in CSS of #GB_caption.
- CSS #GB_window img is for “Close” image that you can replace with any picture. The current image is not the original image of Grey Redux. I made it a lit bit smaller.
- All tags within the div “definition” are the content of dialog. For example, if you dont want one text, one textbox and button to show in dialog, you can replace with anything you want.
Implementing Custom Javascript Dialog in ASP.NET
Please open the HTML View of TestContentPageControl.ascx from the sample project that you downloaded. (As there are a lot of code in this page, I won’t paste all coding here.)
There is one div called “div1”. This is a placeholder where our Custom Javascript Dialog suppose to be displayed. ( As I wanna use “InnerHTML” instead of using “HTML DOM”, you put this div in this page. ) You may notice that the style of this DIV.
- DISPLAY: none; This DIV should not show until the user click the “Delete” button.
- Z-INDEX: 111; If there are other controls placed on your page, you should set the highest value of this style. otherwise, the custom dialog will be shown behind the other controls.
- POSITION: absolute; this is a must since we wanna show the dialog at the center of page
You may also find the hidden input called “hiddenComment” in TestContentPageControl.ascx. The main thing is that this control has to be a Server-side control. So, both client-side script (js) and server-side script (C#) are able to access this control. (I already explain about the use of Server-side Hidden Field earlier.)
After viewing the HTML view of ascx file, we should go and check the PreRender event of page “TestContentPageControl_PreRender”.
There are three javascript functions (hideWindow(), showWindow() and deleteit()) in this event. (You may notice the variable called g_IsWindowShown in this event. I will explain about it later. For the time being, we will just focos on showing and hiding the JS dialog.)
Understanding of hideWindow() Javascript Function
This function is very simple. When the user click “close” image or “cancel” button then we set the “Display” style of div1 to “none”.
Understanding of showWindow() Javascript Function
The following lines is used for getting the clientWidth and setting the dialog at the center of the page.
| |
Then, we declare the variable called str in this function and we will append the HTML code ( that I show in “Creating HTML Window” ) to this variable.
After that, we set this variable to the inner text of div1. (oDiv.innerHTML = strWin;) then, we show this DIV in browser.
Here, we have one problem. After showing our Javascript Dialog, the execute goes to the Server-side. (It is not like that Javascript Prompt. When we are using Javascript Prompt, the execution is paused as long as this prompt is showing.) So, we need some tricks for pausing the execution and re-running the execution.
Trick #1
The javascript variable called “g_IsWindowShown” is declared for this purpose.
As the JS Dialog doesn’t show by default, the default value of this variable become “false”. When the user click “Delete” button, we show the JS Dialog and set this variable to true. **But we return “false” in ShowWindow() function. (so that the execute wont' go to Server-side.)
If the user click “cancel” or “close” image, we call “hideWindow()” function. In this function, we hide the JS dialog and set the variable “g_IsWindowShown” to true. (We also return “false” in this function since we dont want the Server-side code to execute.)
If the user click “Delete It” button then we call “deleteit()” function. In this function, we set the text of textbox to hidden field so that this value can be read from Server-side script. then, we fire the button client event of “Delete” button (not “Delete It” button.) then, showWindow() function will be invoked again. At that time, the variable “g_IsWindowShown” will be true. After that, we just return “true” from this function. So, the Server-side code will be executed. Here is the end of our trick. :)
Demo
– Please open the Demo Project.
– Set the breakpost at btnDelete_Click.
– Please run “TestContentPage.aspx” in Demo Project.
– Select some checkedboxes in the Grid.
– Click “Delete” button
– Type the comment
– Click “Delete It” button in Javascript Dialog.
Ob: The Click event of btnDelete will be invoked and you can check the value of hidden field to see what comment you hav filled. and also, you can see which checkedboxes you have selected.
Conclusion
Sorry if you think that my article is too long.. (plus my writing is also not very interest. :) ) Anyway, I try to explain as much clear as I can and hopefully, you will find it useful.. Please let me know if you have suggestions or comments..