
Deploying the Azure website and Azure webjob from Octopusdeploy (+TeamCity)
Introduction
Last week, it has been a busy week for us but we are glad that managed to bring the Azure WebJobs with Octopus Deploy into one of our small projects. I like to share something that we have learnt and like to get some feedback from you guys.
Azure Web Job
Oh well, Scott Hanselman did a pretty good job on explaining about it in his blog post “Introducing Windows Azure WebJobs” so I am not going to repeat the same thing here. I will just give you a short note on this.
What is Azure Web Job?
It’s a backend job that you want to run it on Azure. It’s like Windows Service that you run on your machine or the batch job that you used to run from Windows Schedular. There are three triggers points as below~
- Azure Storage: You can trigger the Azure webjob to run by sending a message to the blobs, queues or tables in your Azure storage account.
- Scheduler: Just like windows scheduler, you can run the web job either one time or on regular basis.
- Http/https Endpoint: You can run your web job by accessing this endpoint as well.
What are the different between Azure Web Job Vs Cloud Service (Worker Role) Vs Virtual Machine?
- VM: You can install your backend job on VM but you need to maintain your VM on your own. (For example: updating OS/Framework update, security patches)
- Cloud Service: It’s still a VM but is manged by Microsoft so you don’t need to maintain it but still, you might not need a VM to run your backend job.
- Web Job: It’s like using a shared host. You don’t need to maintain any VM and it got full integration with Azure storage as well. If you are a fan of Azure website, you might like it as well.
Where does it store?
The web job are stored in the following directory.
site\\wwwroot\\App\_Data\\jobs\\{job type}\\{job name}
It’s important to know because we are going to use it later. Ok. My short note on Azure webjob will end here since it’s not my intention to write about web job in this post. but there are a lot of useful blog posts regarding Azure webjob so I am sure that you can easily google them.
Or, you can read some of my favorite posts below~
- How to deploy Windows Azure WebJobs
- projectkudu/kudu – web job
- Introducing Windows Azure WebJobs * Windows Azure Scheduler (part 1): Introduction
- Getting Started with the Azure WebJobs SDK
- Use WebJobs to run background tasks in Microsoft Azure Web Sites
Octopus Deploy
Why Octopus? As we have only one production, we don’t need Octopus. I found only one reasons why you will need Octopus Deploy.
That reason is that if you have a lot of servers then Octopus tentacle comes in handy. You can easily configure the octopus tentacle on all of your servers and you can deploy it in one shot. That tentacle will take care of synchronizing the deployment to all servers. Cool, huh?
Note: I asked the octopus team just to confirm whether my assumption is correct or not. You can read in this post “What is the main selling point for octopusdeploy?” Yes. my assumption is correct!
In our case, we can actually publish the Azure website directly from CI (Team City) using MSDeploy.

This is the commandline parameters ~ >
 /p:Configuration=Release
 /p:OutputPath=bin
 /p:VisualStudioVersion=11.0
 /p:DeployOnBuild=True
 /p:DeployTarget=MSDeployPublish
 /p:MsDeployServiceUrl=https://{yourazurewebsite-url}:443/msdeploy.axd
 /p:AllowUntrustedCertificate=True
 /p:DeployIisAppPath={your-app-pool-name}
 /p:MSDeployPublishMethod=WMSVC
 /p:username={your azure website user name from published setting}/p:password={your azure website password from published setting}
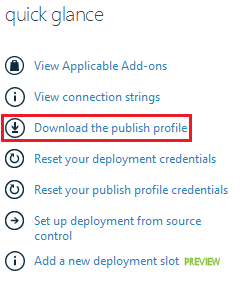
Note: You can get the user name and password from the publish profile from your website dashboard.
I wrote about MS deploy for publishing website a while back. “WebDeploy 3 – Error in publishing website to Amazon EC2”
Anyways, as everyone is talking about Octopus, I thought it might be a good idea to try and get a taste of it. So I downloaded the Octopus (2.4.7) which includes Octopus Server (x64), Octopus Tentacle (x64) and TeamCity Plugin.
Team City + Octopus Team City Plugin
I installed Octopus plugin in Teamciy by placing the zip file under TeamCity Data Directory plugins. If you are not sure about the then you can check it out in “Administration->Global Setting” page in TeamCity. The default path is C:\\ProgramData\\JetBrains\\TeamCity . Then restart the service to take effect on new plugin installation.
If your installation is working fine then you will see “Octopus Packing” in “MS Build runner” build step or “VS build runner” build step.
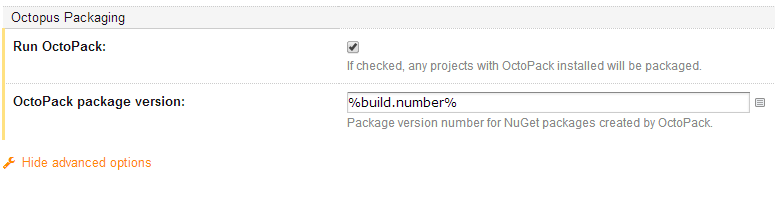
Note that Octopus has the limitation on the version number and it doesn’t work if your version is just a single number so you will have to change like “1.0.%build.counter%” in “Build number format” in “General Setting”.
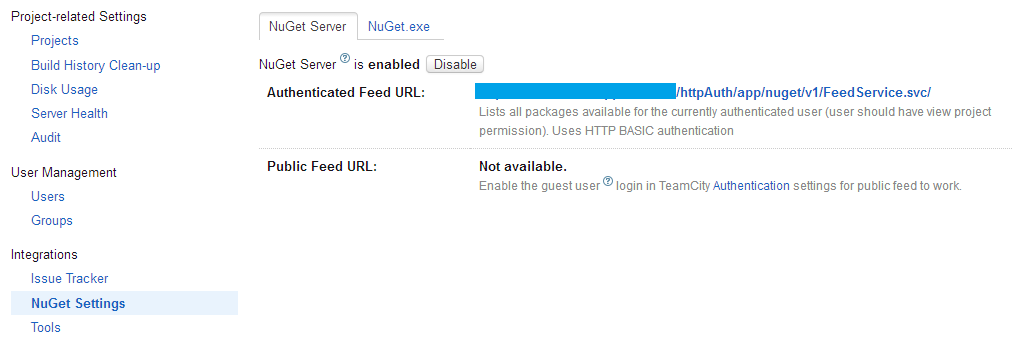
After that, you need to enable the nuget feed in Teamcity administration page.
That’s all. If you want to view the step by step instruction then you can check this page “TeamCity + Octopus Deployment”
Octopus Server
It was pretty easy to install and configure the Octopus server on my server. Good job, Octopus!
Octopus Tentacle
Obviously, I need the server and TeamCity plugins but why Tentacle?
Oh well, Octopus has another limitation beside the build number. It doesn’t work without Tentacle. I think they didn’t think about the deployment scenario where we, developers, don’t have any server. I asked them here (link) to confirm about this. To workaround this, I have to install “Tentacle” on the server that I am hosting the octopus server and configure it as a machine in Octopus’s Environment page.

How to connect TeamCity and Octopus? Yes. You need to add the nuget feed that you enabled in Teamcity by using “Add Feed” button in Octopus Library page.

After that, you can create a new project in Octopus and add the steps in “Process” panel.
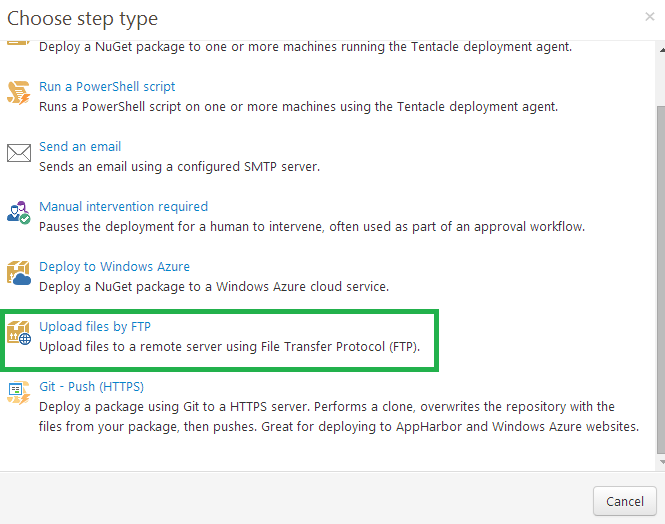
Note that there are a few different ways as below to deploy the Azure website and web job.
- FTP Upload
- Git push
- MS Deploy
Even thought I am told that there is an Octopus MSDeploy template, I decided to use the FTP upload in my case. (Yeah, I am not a big fan of git push deployment until now. Sorry! )
Here is the default FTP template that you can use when you are adding the step in “Process”.
Here is the step details that you need to fill up for FTP template.

You can get about the FTP information of your site or webjob from Azure dashboard.
Remember what we said in “Where does it store” section? The web job are stored in the following location so you will have to point to this directory in your “FTP upload” step.
site\\wwwroot\\App\_Data\\jobs\\{job type}\\{job name}
That’s it. This is how we are using Team City + Octopus for publishing Azure Web Site and WebJob. What is yours?